Saturday, 20 July 2013

The Big Summer Share - Family Days Out, Craft, Recipes, Discounts etc.


We all know what's it's like, the summer holidays arrive and you hope the weather stays good so you can get out and about with family and friends. However one thing that we don't always bargain for is the expense of a day out to a theme park, the zoo or whatnot.  Also if the weather is forecast rain it can often scupper any outside activities.  With this in mind I decided to set up a Facebook group called 'The Big Summer Share'. The idea behind the group is to share summer holiday activities, if you know of an event, activity or have a recommendation then share it with the rest of the group, simple hey? 


Here's my list of the kind of things I thought would be good to share:

1. Any summer clubs, these could be both local or further afield.

2. If your planning a day out and it's an 'open invitation' event then why not share it, this could be a day trip to the beach, woods, park etc.

3. Any voucher/Internet or group/family deals for days out.

4. If people want to car share or plan group bookings on the train.

5. You may have been somewhere really great and why not tell everyone about it on the Big Summer Share.

6. Likewise if you've had a bad experience please let the group know, forewarned is forearmed.

7. Clubs such as Beavers/Cubs/Scouts or the PTA, dance troops, sports clubs; if you have activities or events you can post it for all to see!

8. Rainy day activities, this could include craft, cooking or fun games.

9. Places to eat, have you been somewhere that has great food, is family friendly or just great value for money?

10. Any money saving ideas or deals would be welcomed, we are all watching the pennies these days!


So far the group has been going for a month and is growing day by day, it's an open group so anyone can invite friends to join.  The have been some brilliant ideas for craft activities, recipes, days out, websites to visit and local events.  I even asked the local Primary School to add the website on their weekly newsletter so more parents were aware of the group.

Why not start your own group?  It's easy to set up and it's rewarding to share ideas, save some cash and make new friends.  We have already got an 'open invite' trip to the woods planned, this is where a day out is posted on the group page, locations, times and dates are given and anyone who wants to join in can.

Have a great summer break everyone XXX


Pin It

Sunday, 14 July 2013

Homemade Toffee Popcorn Recipe


When a friend posted her homemade toffee popcorn on Facebook I had to get the recipe.  We make popcorn in the pan a lot at home but tend to stick to our favourite flavour of butter, salt and chilli (Tabasco sauce to be specific).  I thought toffee popcorn would be difficult to make but its surprisingly easy and uses ingredients most people would have to hand.  Needless to say once I'd seen my friends popcorn efforts I set to task making my own batch with very happy results.
 
Here's my friends recipe below:
 
Ingredients for the popcorn
 
75g popcorn kernels
2 tbsp oil (vegetable or sunflower will do)
25g butter

Ingredients for the toffee sauce
 
40g sugar (light soft brown or Muscavado is best)
40g butter
2 tbsp golden syrup
pinch of salt
 
Method
 
1. Heat the oil in a large pan, add the popcorn and swirl it around until coated with oil.
2.  Cover with a tight fitting lid, turn the heat down and wait for the kernels to start to pop.  Keep the popcorn moving so it doesn't burn.  As soon as the popping starts to slow down take it off the heat.
3. While the popcorn pops make the sauce.  Melt the butter, add the sugar and golden syrup and stir over a high heat for 1-2 minutes.  Be careful it doesn't splash as it's extremely hot.  Also  make sure it doesn't burn, keep an eye on it.
4. Melt the 26g of butter and toss with half of the popcorn and the pinch of salt.
5. Pour over the toffee sauce over the remaining popcorn put the lid on and give it a good shake covering the popcorn with the sauce.  Then ass the buttered pop corn, mix and then serve when cool enough.

 
Thank you to my friend for sharing her recipe.  I'd love to hear of any other popcorn toppings you may make at home, feel free to share them with us all.


Pin It

Thursday, 11 July 2013

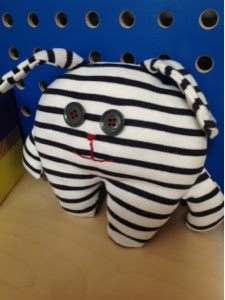
# Quick Crafty Makes 5 - Upcycled Jersey Top Softie Rabbit

I'd made my daughter a softie rabbit and now it's my sons turn to have a softie made for him.  This toy is made out of an old jersey top, some embroidery thread, some stuffing and two old buttons.  My son chose the buttons and thread and I sketched out the shape of the body etc, it's nice to recycle my old clothes into something else.


So here are the instructions:


You will need

Some fabric (preferably recycled)
Embroidery thread
Two buttons (or more if your design requires it)
Stuffing
Fabric scissors
Paper (for the pattern, so not too thick as it will be hard to pin to the fabric)
Pins
Thread


1. Once you've designed your softie toy draw it up on to paper, I've done my pattern without seam allowance, feel free to add seam allowance to yours if this is how you prefer to work.

2. Pin you pattern pieces on to your chosen fabric and cut out remembering to cut the correct amount of fabric pieces required for each pattern piece.

3. Starting with the arms first place one piece on top of the other and sew together leaving a hole in the end to turn through and stuff as shown above and below.


4. For the ears do the same as in step 3 but do not stuff them as you want the ears to be floppy, however fold the bottom end of the ears in half to create some added shape and definition.

5. Place the arms and ears in the required position on to one of the main body fabric pieces, lay the other main body fabric piece over the top sandwiching the arms and ears in between the two main body pieces.  Pin the pieces together securing everything as shown in the photos below. 


6. Finally sew around the main body leaving a small hole between the legs allowing you to stuff your softie toy.  Turn through and once stuffed slip stitch the opening together and sew on your button eyes and other features as desired.


And there you have it, one softie rabbit thingamajig!!!  My son loves him especially as he had a hand in creating him, and it was all done in under and hour.


Pin It

Wednesday, 3 July 2013

Homemade Fishcakes With Homemade Sweet Chilli Sauce


I've been making fish cakes for years and generally just throw a hotchpotch of ingredients together, sometimes they're Asian inspired, other times hearty and homely.  This evening I made fish cakes for dinner and had run out of sweet chilli sauce, after looking for a recipe on the Internet I came across this one, it was so easy to make I'd recommend trying it out yourself.  It took less than 20 minutes to cook and had a great balance of heat, sweet, sour and salt.  I've also added my basic fish cake recipe for your perusal, the two together are a winning combination.

Ingredients

Makes 8 small cakes or 4 large

4 medium potatoes
400g fish of your choice (I used a mix of salmon, smoked haddock and cod)
Zest of one lemon
1 tbsp chopped parsley
1 egg
1 tbsp plain flour

Method

  1. Peel, chop and boil your potatoes, once cooked set aside to cool.
  2. Gently poach your fish until cooked remove skin and bones once cooled and flake (I poach my fish in milk).
  3. Roughly mash your potatoes, add your flaked fish, lemon zest, chopped parsley, egg and plain flour and mix together well.
  4. Cover the mixture with cling film and place in the fridge for at least an hour before cooking, this will firm up the mixture and make it easier to mould into fish cake patties.
  5. Once ready, heat some oil in a pan.  Whilst the oils heating up take a lemon sized amount of the mixture and shape in to a burger shaped patty, coat in plain flour and put in the hot oil.  Repeat until all the mixture is cooked.
  6. Serve with sweet chilli sauce and wedges of lime.


I hope you enjoy!


Pin It

Monday, 1 July 2013

My Daughter Loves to Draw Cats

I couldn't resist sharing these with you, I never knew my 5 year old daughter liked drawing cats so much.  Each one has its own quirky personality and charm; I really like the simplicity of each of them.  They made me smile, I hope you like them too.


Pin It

Monday, 10 June 2013

Monthly Moodboard - It's Been a While


It's been over a month since the last post on Make Do Sew, apologies but at times there are things that happen to us all that take priority over everything and this past couple of months has been tough.  Hence why my blogging and social media activity has been at a minimum.

I don't like to share too much of my private life on my blog as I feel it's unfair on my family who either, don't want to be posted on the internet or are too young to make that choice for themselves.  However at the moment my life is going through a transitional period and this means my usual 2-4 blog posts a week will be a bit sporadic until life reaches some kind of normality.

Despite all this my mind can't help but think up 'crafty makes, and potential blog posts to share, it's a cathartic process that allows the mind a needed rest.  Time permitting I'm intending to post at least once a week and my Monday Moodboards will be monthly for a while.  Thanks to all those who have contacted me, it's been lovely to know that people I've never met are looking out for me, surely that's one of the many beauties that blogging and networking offer.

My Moodboard today is 'yellow', such a happy and optimistic colour that sums up summer wonderfully.


Have a great day everyone. Xxx


Pin It

Friday, 3 May 2013

Guest Blogger 'Create it With Samantha' - Wedding Ring Pouch Tutorial

I am lucky enough to have another great guest blogger featuring on Make, Do, Sew today, Samantha writes 'Create it With Samantha'.  This blog is an eclectic mix of craft, motherhood, home life, vintage and recipes.  It's a really good read and appeals to a wide audience with its broad range of subjects.  Samantha is also in the midst of putting together a website and also has an Etsy shop, she is one busy woman!!!  Today's guest post is a fantastic tutorial with step by step instructions/images to follow.  I hope you enjoy!


Project: Wedding Ring Pouch Designer: Samantha Schofield

This Wedding ring pouch, is a perfect customised gift for the Bride and Groom and also handy for the Best Man too!  Wedding rings are so tiny and on the big day can be easily mislaid, make this little pouch to not only to give reassurance to the Best Man but also a keepsake of the Wedding Ceremony.  I still use mine for holidays, swimming trips, DIYing; those times when it is safer to take your rings off and put them in a safe place.
Here is how you can make this project within two hours with many items from your sewing box.


You Will Need:

15cm x 12cm linen fabric
75cm x cream double faced 3mm ribbon (Cut into 3 pieces 2 x 20cm and 1 x 35cm)
1 skein of embroidery stranded cotton thread DMC 3712
1 pot of fabric paint Dylon gold
Heart stamp (this one was in a stamping kit from Boots.com)
1 cross stitch needle
1 sewing needle
1 spool of self coloured thread
Sewing scissors
Sewing pins
Use of a sewing machine
Cross Stitch Pattern ABC


Let’s Create!


1. Fold The Fabric - fold into thirds length ways and then in half.


2. Stamp Your Hearts - Test first to get your stamping technique perfected on paper! Print using equal amounts of fabric paint across your stamp, five hearts across your fabric using the picture as a guide.


3. Stitch Your Hearts & Initials - thread your needle with two strands of stranded cotton in 20cm lengths. Firstly using a backstitch, outline the printed hearts.
Then following the cross stitch pattern, add the initial of the bride and groom over the hearts which will form the inside of the pouch.
If you are new to cross stitch this link on technique can help. Link to http://www.cross-stitching.com/how-to from a click through from ‘help’


4. Detail of cross stitch and backstitching


5. Add The Ribbons - pin the longest ribbon to the centre back and hand stitch on. With the two smaller ribbons, tie in a knot in the middle. Handstitch the ribbons in the bare centre square so they are in line with the initial hearts. This is where the rings will be secured.


6. Sew The Pouch Together - with the right sides together and the ribbons tucked in, pin and sew on the sewing machine the pouch together down one short side and the longest side. Grade the seams and cut the corner bulk off. Then turn inside out to show correct side. Press. Handstitch up the open side to form a seam. If the fabric frays, it maybe easier to zigzag the raw edge to make easier handling. 


7. Press The Ribbons & Seams - with the end of iron on a low heat press.


Your Finished Wedding Ring Pouch!


For more inspiration visit my website www.samanthaschofield.co.uk or my blog http://createitsamantha.blogspot.co.uk to rediscover vintage and ladylike crafts!


Pin It
Related Posts Plugin for WordPress, Blogger...