Showing posts with label quick crafty make. Show all posts

Wednesday, 14 August 2013

#Quick Crafty Makes 6 - Machine Embroidery - Stag Beetle

beetle machine embroidery

 
After four weeks summer holiday it's back to work for me, the summer has been great, we've been so busy and done so much.  Now that time is going to be limited I thought I'd russel up a last minute craft project.  I saw this stag beetle template in issue 28 of Mollie Makes, I thought it'd be perfect for some free motion machine embroidery.  For tips on how to do this please take a look at a previous post I've written on the subject.
 
I thought this would look good on the wall in a vintage frame or even left in the embroidery hoop,  alternatively you could use this idea as a decoration for numerous items such as a motif on a cushion or bag.  I'd like to sew some other insects and make a small collection of six legged mini beasts to adorn my walls.
 
For this one I've traced, using a pencil, on to some calico and placed the fabric into an embroidery hoop and off I went!  You can find you own motif to trace in many places such as in books, the internet or use fabrics and wallpapers as inspiration.  I also like the idea of sewing some insects in neon brights onto a grey toned fabric, i think this could look great.  Machine embroidery is so quick to do and gives immediate satisfying results and this technique is very forgiving if a mistake it made, it's ok for it to look a bit naive or rough and ready.

 
beetle machine embroidery

beetle machine embroidery


Pin It

Thursday, 11 July 2013

# Quick Crafty Makes 5 - Upcycled Jersey Top Softie Rabbit

I'd made my daughter a softie rabbit and now it's my sons turn to have a softie made for him.  This toy is made out of an old jersey top, some embroidery thread, some stuffing and two old buttons.  My son chose the buttons and thread and I sketched out the shape of the body etc, it's nice to recycle my old clothes into something else.


So here are the instructions:


You will need

Some fabric (preferably recycled)
Embroidery thread
Two buttons (or more if your design requires it)
Stuffing
Fabric scissors
Paper (for the pattern, so not too thick as it will be hard to pin to the fabric)
Pins
Thread


1. Once you've designed your softie toy draw it up on to paper, I've done my pattern without seam allowance, feel free to add seam allowance to yours if this is how you prefer to work.

2. Pin you pattern pieces on to your chosen fabric and cut out remembering to cut the correct amount of fabric pieces required for each pattern piece.

3. Starting with the arms first place one piece on top of the other and sew together leaving a hole in the end to turn through and stuff as shown above and below.


4. For the ears do the same as in step 3 but do not stuff them as you want the ears to be floppy, however fold the bottom end of the ears in half to create some added shape and definition.

5. Place the arms and ears in the required position on to one of the main body fabric pieces, lay the other main body fabric piece over the top sandwiching the arms and ears in between the two main body pieces.  Pin the pieces together securing everything as shown in the photos below. 


6. Finally sew around the main body leaving a small hole between the legs allowing you to stuff your softie toy.  Turn through and once stuffed slip stitch the opening together and sew on your button eyes and other features as desired.


And there you have it, one softie rabbit thingamajig!!!  My son loves him especially as he had a hand in creating him, and it was all done in under and hour.


Pin It

Friday, 4 January 2013

#Quick Crafty Makes 4 - Random Softie Rabbit

I love the ugly dolls and softies I have seen on the internet, they look effective and the random nature of their bodies and facial features adds to their character. I had a spare hour and the urge to use my sewing machine so decided to make my own.

This has got to be the cheapest, quickest and easiest make I've ever done. A couple of pieces of scrap calico, a quick wizz on the sewing machine, some stuffing and simple embroidery stitches to add features and voila, my rabbit is complete. The more random the shape the better.

This took less than an hour and my children are already arguing over him, so much so, that I now have to make another!


Pin It

Wednesday, 5 December 2012

#Quick Crafty Makes 3 - Paper Pom Poms (stained with beetroot juice)

Another quick make, paper pom poms, they are cheap, easy and effective. They look great for Christmas, children's parties, weddings etc. The thing that takes the longest with this make is waiting for the paper to dry once dyed, the thicker the paper the longer it takes. Alternatively you could buy coloured paper and fore go the dying. Tissue or crepe paper works best for these.

I only had white tissue and crepe paper and wanted to dye it, beetroot was lurking in my fridge so 'voila' beetroot juice stain it was, it is such a beautiful colour.

See my step by step guide on how to make.
homemade paper pom pom

You will need:

some tissue or crepe paper about 10 sheets to the size you want
fine wire
inks/dyes (or beetroot juice)
PVA glue
scissors
glitter

homemade paper pom pom

::cut your paper in to squares, layer them on top of each other and fold in to a concertina fan::

homemade paper pom pom

::dip the end of your paper in to the dye::

homemade paper pom pom

::ensure you dip both ends and leave a gap for the dye to bleed into the paper::

homemade paper pom pom

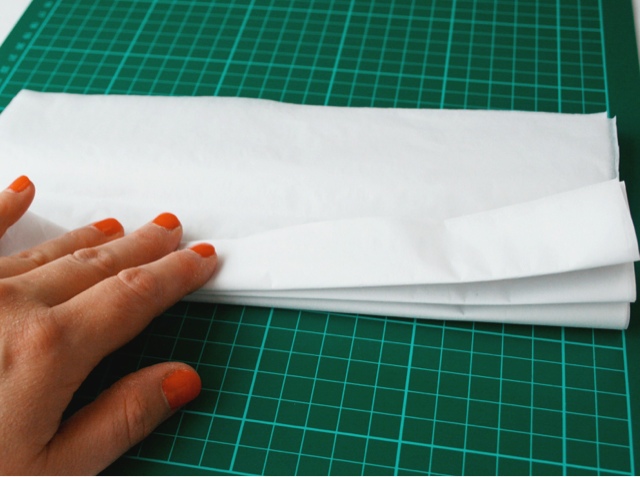
::once you have done this you will need to carefully separate each sheet and leave to dry, I put mine on the radiator for super quick drying::

homemade paper pom pom

::once dry lay them neatly on top of each other again::

homemade paper pom pom

::refold into a fan shape::

homemade paper pom pom

::bend in the middle::

homemade paper pom pom

::cut your ends to the required shape, they can be pointed, rounded whatever takes your fancy::

homemade paper pom pom

::cut a length of wire about 20cm long and wrap this around the middle crease of your folded paper::


homemade paper pom pom

::fashion a hanging loop by twisting the wire together::


homemade paper pom pom

::and looping at the end::

homemade paper pom pom

::carefully start to unfold each layer of tissue paper from each side, take your time and try to pull each layer out fully::

homemade paper pom pom

::keep shaping the paper until you get a full round pom pom::


homemade paper pom pom


Taking it Further

homemade paper pom pom

::mix PVA glue with water and glitter and gently paint a thin payer on to your pom pom to get a shimmer effect::

homemade paper pom pom

:: add another pom pom this ones made from crepe paper for added texture and contrast::

homemade paper pom pom
Pin It

Saturday, 24 November 2012

#Quick Crafty Makes 2 - Glitter Pin Wheels

I had never made a pin wheel before, I thought they would be super tricky to make, how wrong was I? They are so easy and can be made from any robust card or paper. I decided to have a go at making single pin wheels to place on a Christmas tree or on the mantle piece, this then led to a pin wheel garland. If you're a pin wheel virgin give it a go, follow my step by step instructions below.

Pin wheel tutorial

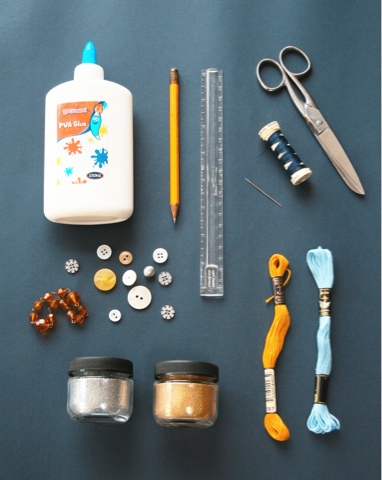
You will need:
some robust card
some PVA glue
scissors
glitter
a pencil
a ruler
some buttons
a needle and thread
embroidery thread


Pin wheel tutorial


Step 1: cut your card into a square and mark a cross on the back from corner to corner.


Pin wheel tutorial


Step 2: On the front of the card create your own decorative design using the glue and glitter and leave to dry


Pin wheel tutorial


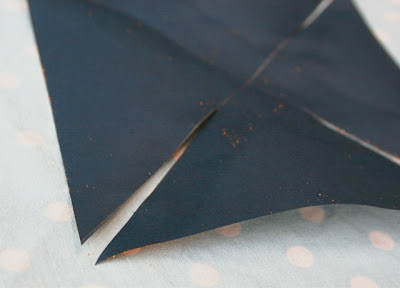
Step 3: Once dry turn the card over to reveal the cross and cut 3/4 of the way down from the corners to the middle.


Pin wheel tutorial


Step 4: Thread your needle and double up the thread, knot at the end.  Push the needle up through the centre of the cross.


Pin wheel tutorial


Step 5: Fold each alternate point to the centre of the square sewing through each one in turn.


Pin wheel tutorial

Pin wheel tutorial

Step 6: Once each point is secure sew a button in place and tie off at the back, use some sticky tape to secure if required.  And there you have it, one finished pin wheel.

Pin wheel tutorial

The above pin wheels are not designed to rotate, to do this you will need some dowel rod (or similar) and a pin.  Click on the link to see a good tutorial on how to do this.


Pin It

Sunday, 28 October 2012

#Quick Crafty Makes 1 - Typography


Quick crafty makes...what's that all about?  Well, I will be posting speedy makes that take under 2 hours to create and achieve a respectable, if not wonderful outcome.  This idea came about due to my lack of time, I'm a working mum who tends to be rushing around most of the time.  I'm sure this sounds familiar to most parents who work and have a family.


Luckily I work part time but I still have to manage the house, school runs, nursery etc etc, don't get me wrong I'm not complaining I'm just busy!  The only time I get to apply myself totally is when my baby has his nap time which last about 2 hours, I can whip out my scissors, pins, sewing machine etc and get stuck in. (See my previous post for more on this).


The technique used is free-motion machine embroidery, this is where you essentially draw using the thread on your sewing machine.  It's a really easy technique you just need to have your machine set up properly.  Click on the link below for a great website with more info on this.


You will need:


A sewing machine capable of free motion sewing
An embroidery hoop
A selection of different colour threads
A sturdy fabric (light weight fabrics such as chiffon might be problematic)
A pencil for marking out your design


If possible get all your equipment ready in advance so you can optimise the time available for actually sewing.


1. On your computer select a letter and font, print this out to the size you require, the bigger the letter the longer it may take.

2. There are two approaches to step 2 I've tried both.
a. Pin your print out to your chosen fabric then place both in the embroidery hoop.
b. Using a pencil lightly trace your font on to your fabric, this is less bulky and in my opinion gives a better result.


3. Ensure your fabric is nice and taught in the embroidery hoop, when tapped the fabric should sound like a dull drum.

4. You can now begin to free-motion sew your design on to the fabric.  Don't worry too much about your sewing being ultra neat, this technique is supposed to be a bit haphazard.  It's up to you how much density your design has, the more you sew the denser the design will be.


NB: if you are sewing over a paper template you will need remove the paper at this point, try to remove as much as you can.  I know some people like to leave parts of the paper on their design to add texture.  If you like the way this looks go for it.


free motion embroidery typography


5. Once you are happy with your outline you can now add some colour or maybe not, it's up to you.


free motion embroidery typography


6. Finally, press and trim off any loose threads (if you want leave some threads there to add further interest to your design then do).
And...voila you are done!


free motion embroidery typography


I love this technique, I did have some problems initially with tension and my needle broke a few times but I did manage to do a whole letter in under 2 hours.


If you decide to give this a go I'd love to hear how you get on.


Lou x
Pin It
Related Posts Plugin for WordPress, Blogger...