Showing posts with label handmade. Show all posts

Friday, 4 January 2013

#Quick Crafty Makes 4 - Random Softie Rabbit

I love the ugly dolls and softies I have seen on the internet, they look effective and the random nature of their bodies and facial features adds to their character. I had a spare hour and the urge to use my sewing machine so decided to make my own.

This has got to be the cheapest, quickest and easiest make I've ever done. A couple of pieces of scrap calico, a quick wizz on the sewing machine, some stuffing and simple embroidery stitches to add features and voila, my rabbit is complete. The more random the shape the better.

This took less than an hour and my children are already arguing over him, so much so, that I now have to make another!


Pin It

Wednesday, 21 November 2012

Etsy Festive Finds - Christmas Decorations

We love Christmas in our house, party games, good food and good company, it makes you feel all warm inside. If you're tired of the same old Christmas decorations why not have a look on Etsy, there are hundreds to choose from and prices range from a few pounds upwards. They are lovingly handmade and each one is unique.  Here's a few of my favourites to whet your appetite and empty your purse!


Pin It

Wednesday, 14 November 2012

Glitter Chocolate Truffles Recipe

I saw this recipe in the latest issue of 'The Simple Things' magazine (issue 3), it has very few ingredients, is easy to make and tastes gorgeous.  It's a perfect treat for Christmas and can even be boxed up and given as a gift.  Keeping in mind the festive spirit I've added some extra sparkle to mine.
Recipe
200g dark chocolate
100ml double cream
5 tbsp coco powder
1/2 tsp ground cinnamon
1/2 tsp ground cloves
Method
  • Chop the chocolate up in to small pieces and melt in a bain marie ensuring the bottom of your bowl is not in contact with the simmering water
  • Once the chocolate has melted stir in the double cream and take off the heat once combined
  • Allow to cool (put it in the fridge if need be)
  • In a shallow dish sift together the coco, cinnamon and cloves
  • Roll the cooled mixture into small balls and then coat in the powder mix until thoroughly coated
Tips and Additions
  • You could add rum, orange oil, honeycomb pieces, chilli flakes or nuts to the mix for added texture and flavour
  • You do not have to add the spices to the coco powder if not to your taste

Chocolate truffles

Chocolate truffles
Pin It

Monday, 15 October 2012

Hearts & Anchors - Homemade Draught Excluder


handmade draught excluder
 
 
I thought it was about time I put another sewing project on my blog (it is called Make Do SEW after all).  The nights are drawing in and the weather is getting colder, a draught excluder is the perfect mini project.  I added some freehand machine embroidery and reverse applique inspired by Poppy Treffys work, see the link for the website below.
 
Machine embroidery is so easy, if your machine has the capacity to do a darn stitch and you can lower the feed dog then you do can freehand machine embroidery.  You will need an embroidery hoop and it is better to have good quality thread and a loose tension setting on your sewing machine.
 
You may want to sketch up some rough designs, I prefer to just see what happens and not plan too much!!


See my step by step instructions below.
 
Step 1: Measure the width of your door and decide the depth you want for your draught excluder.  Multiply the depth by 2, add on a 1cm seam allowance all the way around the pattern for the finished size needed.  For the optional hanging loop, again work out the dimensions you want and add 1 cm seam allowance all the way around.


Step 2: Cut out the motif shape you want to the size and number you require.


Step 3:  Pin your motif on to your base fabric, the right side of the motif fabric should be facing down.


Step 4: Place your embroidery hoop over the motif and tighten the screw to secure.  You will need to pull the base fabric so there is no slack in the fabric within the hoop.  You will know the tension is correct when you tap the fabric and is sounds like a dull drum.


Step 5: Stitch the motif to the base fabric, don't worry about neatness, the more haphazard the better.  Sew around the motif until you get the density of stitching you want.


::sew until you get the density of stitch you want::

 
::sew your motif as many times as needed::


Step 6:  Taking great care not to cut the motif fabric, cut away the base fabric from the inside of the embroidery stitching to reveal the right side of the base fabric underneath.


Repeat steps 5 and 6 until you have added the desired amount of motifs.


Step 7:  For the freehand machine embroidery motif place your embroidery hoop on the fabric in the required location and start to sew your design, as in step 5 don't worry about being too neat and add as much embroidery you want until you get the density of stitch you like.


::sew until you get the required density of stitch::

 
::see finished reverse applique and machine embroidery below::


Step 8: Fold the fabric for the hanging loop in half longways and sew 1cm in from the edge, turn this through so the seam is on the inside.  You can do this by using a safety pin, it is easier if you trim the 1cm seam allowance to about 0.5mm.  Once turned through ensure the seam runs down the middle and press.  This seam will go on the inside once made up so it wont be seen.


::1cm seam allowance::

 
::trim seam allowance down to 0.5mm, turn through and press with seam running down the centre on the loop::


Step 9:  Fold your draught excluder fabric in half longways ensuring the right sides are together and pin, add the hanging loop in the desired location and sew a 1cm seam (the loop should be on the inside with a small overhang on the outside to be secured in place when sewn).  Ensure you leave the end without the loop unsewn so you can turn the fabric through to the right side and stuff.


 ::right sides together::
 
 
 ::add hanging loop to required end::
 
 
 ::turn through and stuff::


Step 10:  Tuck in the raw edges and pin to create a neat end, slip stitch the edges together if you want an unseen stitch or top stitch on the machine if you don't mind a visible sewn edge.


::click on the link to see a good slip stitch tutorial, how to slip stitch::


The finished product!!!

I've kept my design simple however buttons, ribbons, ricrack and other types of embellishment can be added too.

Pin It

Sunday, 9 September 2012

Friendship Bracelets - Back to the Old Skool

Do you remember the old days when you'd sit in your lessons at school surreptitiously making your friendship bracelets? Okay, it's just me then!!  Seeing this article in Mollie Makes brought back so many memories, I was obsessed with them, it was a bit of a craze at my school.  Until I saw this article I'd completely forgotten that I knew how to make them.  It was with much delight that I passed on this simple skill to my daughter.  She was fascinated for the first half an hour but soon got bored with the knot tying.  Anyway, see our effort below.

Pin It

Sunday, 15 July 2012

Handmade Teddy Bear - Mohair

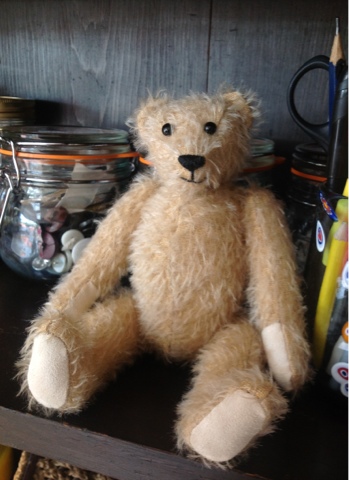
Traditional handmade teddy bears are so endearing, my brother still has his much loved teddy bear even though he has been patched a few times. I wanted to make a bear for each of my children and bought a kit from an online shop called Teddycraft. The kit consists of a pattern, traditional mohair fabric, glass eyes and all the stuffing and joints. The kit costs £14.95 which I think is reasonable as the bear will last a lifetime and is essentially a family heirloom. I really enjoyed making him and found the process straightforward. This teddy is 20cms tall however I can reuse the pattern and enlarge it on the photocopies to make a larger bear. Check out teddycraft.co.uk

Pin It

Monday, 9 July 2012

Handmade Felt Owl - night and day

One of my dear friends has just had a baby. Instead of buying a gift I decided to make a toy felt owl, one side is a night owl, the other a day owl. The embroidery used for the open eyes is satin stitch and stem stitch for the closed eyes. I'm really happy with the result, not bad for an hours work and really easy to do. I've managed to save myself some cash and make a great gift with a personal touch. I've included 'how to make' step-by-step photos below.
Pin It

Sunday, 8 July 2012

Scandinavian Needlecraft Book Review

Scandinavian Needlecraft - 35 step-by-step projects to create the Scandinavian home

Author Clare Youngs

Published by Cico Books

I've bought another Scandinavian craft book to add to my growing library. This book focuses on craft projects for the home inspired by folk art, nature and natural materials. The introduction explains the ethos of 'hygge', a Danish word that means 'wellbeing, comfort, coziness and pleasure in the simple things in life. This really appealed to me and is akin to my own life ethos. Each project has a foreword explaining the inspiration behind the item being crafted. The embroidery designs in this book cover both machine and hand embroidery, the stitches are basic but are beautiful in style. All projects in this book involve needlecraft or embroidery. The instructions are clear and supported by, photographs, illustrations and templates. The difficulty levels vary and there is something for everyone in terms of skill and style.

Pros - A wide range of great craft projects for the home that are beautifully designed. There are some good templates towards the back of the book with a clear key on each page explaining the stitches needed for each project. The felt embroidered baby boots in this book are gorgeous and could be up scaled for an adult. Another appealing project is a 'crested bird' chair pad that incorporates vivid colours and pompoms.

Cons - If embroidery and needlecraft is not your thing then this book is not for you (after all the clue is in the title). The illustrations in this book are not as clear as I would like, however this is a personal preference.

I would recommend this book, it would be a great addition to any crafters book collection.


Pin It
Related Posts Plugin for WordPress, Blogger...