Tuesday, 24 July 2012

Homemade Meringue Recipe - easy peasy!!

I love meringues, I especially love homemade meringues, crisp, sweet and chewy, they are also fat free!!  I often make dishes that only require eggs yolks so am left with the whites which I used to throw away!! Meringues work better with egg whites that have been stored for a couple of days. Thinner older egg whites whip more easily and create more volume than newer egg whites. The simple rule of thumb is that you use 2oz of caster sugar per egg white. This has always worked for me regardless of the size of egg being used, I have also never added vinegar of cornflour. I use a food processor but have made these meringues by hand, it just takes a bite more elbow grease. They are so easy to make and I'm sure most people who bake can whip them up in an instant, however I thought I'd share the basic recipe....you never know it might come in handy some day.


Basic Meringue Recipe

3 x egg whites
175 g (6oz) caster sugar


1. Pre-heat your oven to 150 degrees centigrade
2. Line a baking tray with baking parchment
3. Add the egg whites to a clean bowl/food processor bowl, whip until they form stiff peaks (don't over whisk or the meringues will start to collapse)
4. Once you are at this stage you can add the sugar about an ounce at a time, keep whisking and adding the sugar until it's all gone
5. Using a metal spoon create either one large meringue (pavlova shape) or lots of small meringue blobs onto the prepared baking tray
6. Once complete place in the middle of the oven and immediately turn the heat down to 130 degrees centigrade and cook for about an hour keeping an eye on it.  If the meringues appear to be getting over coloured turn the heat down a little more
7. Once the hour is up turn the oven off and leave the door ajar, leave the meringues in the oven to completely cool
8. Serve with whipped cream and fresh fuit or to your liking
Pin It

Crochet Baby Blanket - Aran Yarn

Finally, it's finished!!! I was going to put a shell edging around the blanket but it looked clumsy as the aran yarn was too chunky. In the end I settled for a simple scalloped chain stitch. I made this blanket as a gift for a family member who's just had a baby girl. She loved it!!!

Pin It

Sunday, 15 July 2012

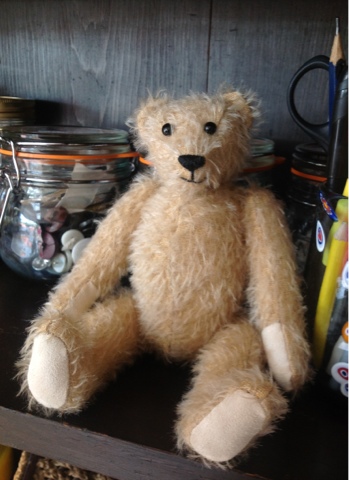
Handmade Teddy Bear - Mohair

Traditional handmade teddy bears are so endearing, my brother still has his much loved teddy bear even though he has been patched a few times. I wanted to make a bear for each of my children and bought a kit from an online shop called Teddycraft. The kit consists of a pattern, traditional mohair fabric, glass eyes and all the stuffing and joints. The kit costs £14.95 which I think is reasonable as the bear will last a lifetime and is essentially a family heirloom. I really enjoyed making him and found the process straightforward. This teddy is 20cms tall however I can reuse the pattern and enlarge it on the photocopies to make a larger bear. Check out teddycraft.co.uk

Pin It

Thursday, 12 July 2012

My Day Today

It's been a busy day today, lots going on. Made some alterations for a friends dance costumes, had to rush them so wasn't overly happy with the quality of the work. As long as they are functional.....
My Mum is visiting for a couple of weeks, she lives in Oz. Some British summertime we are having at the moment rain, sun, rain then more rain. When will summer arrive??? Will summers be like this from now on? My friend showed me a website called cats in bread (.com), not too sure how I feel about it, I will not be doing this to my cat. Had some good ideas for more blog content, watch this space. How was your day today?
Pin It

Monday, 9 July 2012

Handmade Felt Owl - night and day

One of my dear friends has just had a baby. Instead of buying a gift I decided to make a toy felt owl, one side is a night owl, the other a day owl. The embroidery used for the open eyes is satin stitch and stem stitch for the closed eyes. I'm really happy with the result, not bad for an hours work and really easy to do. I've managed to save myself some cash and make a great gift with a personal touch. I've included 'how to make' step-by-step photos below.
Pin It

Sunday, 8 July 2012

Scandinavian Needlecraft Book Review

Scandinavian Needlecraft - 35 step-by-step projects to create the Scandinavian home

Author Clare Youngs

Published by Cico Books

I've bought another Scandinavian craft book to add to my growing library. This book focuses on craft projects for the home inspired by folk art, nature and natural materials. The introduction explains the ethos of 'hygge', a Danish word that means 'wellbeing, comfort, coziness and pleasure in the simple things in life. This really appealed to me and is akin to my own life ethos. Each project has a foreword explaining the inspiration behind the item being crafted. The embroidery designs in this book cover both machine and hand embroidery, the stitches are basic but are beautiful in style. All projects in this book involve needlecraft or embroidery. The instructions are clear and supported by, photographs, illustrations and templates. The difficulty levels vary and there is something for everyone in terms of skill and style.

Pros - A wide range of great craft projects for the home that are beautifully designed. There are some good templates towards the back of the book with a clear key on each page explaining the stitches needed for each project. The felt embroidered baby boots in this book are gorgeous and could be up scaled for an adult. Another appealing project is a 'crested bird' chair pad that incorporates vivid colours and pompoms.

Cons - If embroidery and needlecraft is not your thing then this book is not for you (after all the clue is in the title). The illustrations in this book are not as clear as I would like, however this is a personal preference.

I would recommend this book, it would be a great addition to any crafters book collection.


Pin It

Saturday, 7 July 2012

Vintage Fabric Bunting - Homemade

I know!! Everyone can make bunting, but being as its a Jubilee year I thought I'd get my bunting out and put it up for my daughters birthday. I made this last year out of a stash of vintage/retro fabric I'd been given. We all love bunting.....don't we?
Pin It

Homemade Flower Press

This flower press has been made from thin sheets of MDF layered up. Holes have been screwed in the corner of each sheet and large nuts and bolts have been fitted to adjust the pressure. My partner made this for our daughter, he also etched the design in to the top to personalise it. It works really well and because it's pretty large our daughter was able to press large flowers such as poppies and roses. See her first efforts below, they look lovely. I also really like the indentations the flowers leave behind. They remind me of miniature botanical watercolours.
Pin It

Homemade Cotton Reel Holder

My partner made this cotton reel holder for me, he's a furniture maker/designer by trade (lucky me!!) and is really practical. He made it out of MDF board, painted it black and then distressed it with sandpaper to create a vintage look. He then marked and drilled the holes to accommodate the dowel. Each dowel was cut to size and shaped at the end and then hammered in to a hole. It works really well and looks great!!!
Pin It

Tuesday, 3 July 2012

Bargain buys - Wedgewood Glass Birds

I love my bargain birds!!!! I bought the brown one on EBay for £3, the other was a charity shop buy for £1.50. They are both Wedgewood paperweights and can sell for up to £30 each. I think they are 1970's, I love the simplicity of the design.
Pin It

Sunday, 1 July 2012

Scandinavian Stitches Book Review

Scandinavian Stitches - 21 Playful Projects With Seasonal Flair

Author - Kajsa Wickman

Published by Stash Books

I love Scandinavian style and this book is packed full of great craft projects inspired by the seasons. I love the birds drawn by the authors daughter that have been used as an appliqué on a mini quilt. The projects are deceptively simple but anyone tempted to undertake them will need to have some basic craft knowledge and basic kit. However saying that there are some good beginner projects such as an Easter inspired bird ornament that is simple and effective.

Pros - The image quality is good as are the illustrations and instructions, there are plenty of templates that can be photocopied.

Cons - a lots of the projects involve appliqué, only really a con if appliqué is not your thing.

I'm happy with this book and will post my craft efforts upon completion, a good book, would recommend.

Pin It
Related Posts Plugin for WordPress, Blogger...