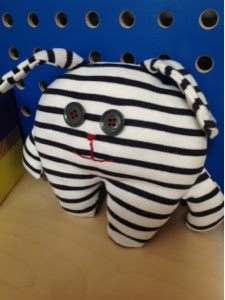
I'd made my daughter a softie rabbit and now it's my sons turn to have a softie made for him. This toy is made out of an old jersey top, some embroidery thread, some stuffing and two old buttons. My son chose the buttons and thread and I sketched out the shape of the body etc, it's nice to recycle my old clothes into something else.
So here are the instructions:
You will need
Some fabric (preferably recycled)
Embroidery thread
Two buttons (or more if your design requires it)
Stuffing
Fabric scissors
Paper (for the pattern, so not too thick as it will be hard to pin to the fabric)
Pins
Thread
1. Once you've designed your softie toy draw it up on to paper, I've done my pattern without seam allowance, feel free to add seam allowance to yours if this is how you prefer to work.
2. Pin you pattern pieces on to your chosen fabric and cut out remembering to cut the correct amount of fabric pieces required for each pattern piece.
3. Starting with the arms first place one piece on top of the other and sew together leaving a hole in the end to turn through and stuff as shown above and below.
4. For the ears do the same as in step 3 but do not stuff them as you want the ears to be floppy, however fold the bottom end of the ears in half to create some added shape and definition.
5. Place the arms and ears in the required position on to one of the main body fabric pieces, lay the other main body fabric piece over the top sandwiching the arms and ears in between the two main body pieces. Pin the pieces together securing everything as shown in the photos below.
6. Finally sew around the main body leaving a small hole between the legs allowing you to stuff your softie toy. Turn through and once stuffed slip stitch the opening together and sew on your button eyes and other features as desired.
And there you have it, one softie rabbit thingamajig!!! My son loves him especially as he had a hand in creating him, and it was all done in under and hour.
Pin It


