Thursday 28 February 2013

Turn That Frown Upside Down


Goodbye February, no offence but I'm glad you've gone, it's been a bit of a rubbish start to the year and we've had a run of bad luck what with one thing or another.

1. January saw the Noro virus come and NOT go as quickly as I would have liked.

2. February bought car crash number one, smash! bang! straight in the back of my stationary car (not my fault), everyone was fine but it caused £1400 of damage which luckily we don't have to pay.

3. This then led on to two weeks of awful sinusitis; I've never had this before, oooowwww is all I can say. Never again will I think it's just a bad case of congestion, any of you who are regular sufferers I sympathise with you. It's a real stinker of a condition.

4. The day after I had my car returned from the body works garage I then had a freak accident which ended up with my car head first in a ditch. You can imagine my embarrassment at having to phone up the same garage and explain the situation. My children (2 and 5 years old) were in the car for both crashes and were fantastic, needless to say I am a very proud mum.

5. Finally a lump was found in my breast and a hospital appointment quickly booked.

Phew, sorry for the rant, I don't tend to do this on my blog, but as they say a problem shared is a problem halved.

Anyway all this turbulence of late has led to me thinking about luck or fate, whatever you want to call it. Surely it's my turn to have some good luck? However if you think about it rather than having a run of bad luck I have actually had a run of enormous good fortune! Here's why.

1. No one was hurt badly in both accidents, the result could have been much worse, potentially fatal!

2. The car that hit me was fully insured with very apologetic conscientious owners, thus resulting in a situation that was easily resolved.

3. I lost 7lb due to having the Noro virus (every cloud.....).

4. The sinusitis has gone (thank God).

5. I had my hospital appoint today and after a mammogram and ultrasound got the ALL CLEAR.

So many of my lovely and much loved family and friends have been very supportive and this has added to my feelings of good fortune and well being.
Just by changing my perspective on the past couple of months I now feel overwhelmingly blessed, I really am a very lucky girl. So as those Monty Python boys say 'always look on the bright side of life'!


Pin It

Wednesday 27 February 2013

Shortbread Star Biscuits Recipe

These biscuits are simple but very tasty, they are light and crisp. My children loved them needless to say they didn't last long in our house.


Here's the recipe below, I hope you enjoy.

Ingredients

150g (5oz) plain flour
100g (4oz) room temperature butter
75g  (3oz) icing sugar
1/2 tsp vanilla extract
1 egg yolk

Method

1. Beat the butter and sugar together in a mixing bowl until creamy.
2. Add the egg yolk and vanilla and stir in.
3. Sieve in the flour and mix in until a dough forms.
4. On a floured surface shape the dough in to the ball, wrap in cling film and place in the fridge for a couple of hours.
5. Once chilled roll out and cut in to the desired shapes.
6. Bake in the oven on 170*C for 15 mins or until golden, keep an eye on them, they can burn easily.

You can add any flavours you like, lemon and poppy seeds are a lovely addition as is lavender, orange, nuts or caraway seeds. Kids will love decorating them and they are best eaten within 5 days of baking if stored in an airtight container.


Pin It

Monday 25 February 2013

#Monday Moodboard - Where Has the Time Gone?

Half term has flown by and half the jobs I intended to do didn't get done. Time is a luxury that we don't have much of in our house, not that I'm moaning, I prefer to be busy than bored.


Only five weeks until the Easter holls!


Whatever you are up to have a wonderful week.


Pin It

Sunday 24 February 2013

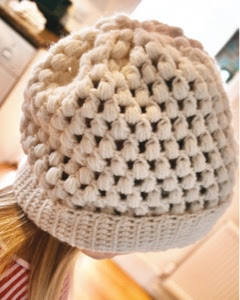
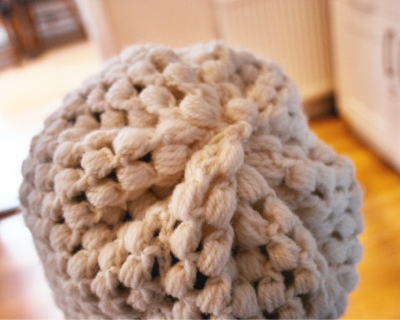
Crochet Slouchy Hat - Puff Stitch Tutorial

During the cold weather we've been having lately I realised I didn't own a winter hat, after some searching on the Internet I found a pattern I liked on Ravelry. I've never followed a crochet pattern until recently, normally I stick to simple blankets or make up my own jumbled designs. I found this pattern so easy to follow and was really happy with the results.


Puff Stitch Crochet Hat

I used a Aran yarn and a 7mm hook. I thought I'd include a quick video tutorial of how to do the puff stitch as it looks effective and is very easy to do. I'm now going to make a scarf and am going to go back to my old ways of making it up as I go along. You can't go wrong with a long rectangle surely. Needless to say I'll post my results here.


Puff Stitch Crochet Hat


Pin It

Friday 22 February 2013

Ocean Waves - Guest Post

Hi I'm Susie and the very lovely Lou has kindly invited me to guest post on her blog which is a huge honour and really rather exciting. I mused for ages on what totally brilliant subject would be perfect for such a stylish blog and then a truly incredible happenstance occurred. The great thing about the blogosphere is that it gives you the opportunity to meet like minded people, connect with their lives and share the moments that make life special.

I have never met Lou in person but we have stuff in common. We blog, we teach, we bake, we make, we love our children and are separated from some of our family by thousands of miles, way too long on an aeroplane and definitely more money than we could make from our craftiness (although actually Lou is so talented she could probably make a tidy packet).

When the opportunity to guest blog coincided with an invite from my sister to head off to Australia to look after her daughter whilst she had what turned out to be her son, I thought a bit of winter sun would be the ideal subject.

I arrived in Kiama, NSW, Australia on 1st February 2013 for a flying visit. Isn't it beautiful?


For some, having children is a breeze and for others like my sister and myself, it is a difficult and traumatic process. I did not sail through any of my pregnancies with a healthy glow. Instead I spent hours laying in hospital beds always fearful of the worst, too sick to eat, alone, frightened and anxious. My sister has suffered that fate that is all too common and has had to wait six years for her little man to arrive.

Of course I couldn't fly half way around the world to meet my nephew without some crafty endeavour. The day after he arrived and with my head spinning from the long flight, the excitement and soaring temperatures, I walked into a little yarn shop in Kiama and picked out a selection of ocean coloured yarns.


 The woman who ran the shop was brilliant and incredibly helpful. I loved that she didn't even know how to knit when she took over the shop from a woman who had run it for 40 years. We chatted and agreed on how neither of us had to the time and patience for knitting patterns with all that counting and concentrating. Any how I took home my package of yarn and my big needles and cast on a huge amount of stitches and began to knit.


I knitted on the grass outside school on the school run. I knitted on the beach. I even knitted on the way to the rain forest. It didn't take me long to realise the enormity of the task I had set myself and wonder why, when I am so bad at knitting that I had decided to knit a blanket and perhaps a small crocheted teddy would have been a better plan for such a short stay.
So I knitted and knitted and knitted. Yes I could have packed it in my suitcase, finished it at home and then posted it back but just ask the unfinished crocheted blanket that I've been working on for two years, how likely that would have been. No this was one project I had to finish by the deadline of my flight home (I'm in transit now as I type.)
........so did I finish this bad knitting challenge? Of course I did! The blanket is totally un-blanket shaped (very wide and not at all long) but it is completed and embellished with a crochet edge.


 It does so remind me of the ocean waves and will be warm and cosy as the autumn and winter approach the Southern Hemisphere. And when it gets too small for wrapping a baby, it works perfectly well for cosying up the big sister.


Thank you very much for having me and if you do ever feel like popping in for a chat, you can find me over at Ridgeway Cottage Anyhow. 
Pin It

Another Great Guest Blogger!


As some of you may be aware I am lucky enough to be hosting some great guest bloggers on Make, Do, Sew this year. My second guest is Susie, a blogger I've admired since I first stared blogging, Susie writes a blog called Ridgeway Cottage Anyhow, take a look. It's full of great ideas and insights in to everyday life including a page about her cat Herbie!


Susie also has an Etsy shop where she sells her gorgeous hand made prints and other paraphernalia, I especially like her toadstool knitting needles.


Susie has written a great post that's both heartfelt and interesting and as always comments are very welcome.


Pin It

Thursday 21 February 2013

Carrot, Date and Sultana Cake Recipe


I've only ever made a carrot cake once before and it was lovely, however I like my carrot cakes with lots of carrot, fruit and nuts so I've adapted a recipe to suit my taste. It's nice with a butter icing or sweet cream cheese filling/topping.


Ingredients

7oz (200g) Self raising flour
7oz (200g) Grated carrots
6oz (175g) Light soft brown sugar
4oz (115g) Sultanas
4oz (115g) Dates chopped
4oz (115g) Chopped mixed nuts
1 tsp Baking powder
1/2 tsp Bicarbonate of soda
1/2 Whole nutmeg finely grated
1 tsp Mixed spice
300ml Vegetable oil
Zest of one orange
3 x Free range eggs
Pinch of salt


Method

Preheat the oven to 160C/320F/Gas 4. Grease and line a 20cm/8in loose-bottomed cake tin.

1. Place the flour, sultanas, chopped nuts, mixed spice, nutmeg, baking powder, bicarbonate of soda and salt in a large mixing bowl and stir until combined.
2. Beat the eggs and the oil and sugar and mix until thoroughly combined.
3. Make a well in the centre of the dry flour mixture and gradually beat in the egg/oil/sugar mixture until smooth. Now stir in the carrots and orange zest until evenly distributed.
4. Pour the cake mix into a greased and lined cake tin (base only with grease proof paper).
5. Bake in the centre of the oven for about 40-60 mins, until the cake is well risen and golden brown. (The cooking time can vary depending in your oven, check the cake after 30 mins, test
by inserting a skewer into the centre of the cake. If the skewer comes out clean the cake is ready, if not cook for longer checking every 15mins.)
6. Once cooked remove the cake from the oven and allow to cool in the tin for five minutes and then remove the cake from the tin and cool on a wire rack.
7. If icing your cake wait for it to cool completely before doing so, otherwise the icing will melt.

This is a great cake that will last well for a few days in an airtight container. The mix can also be used for muffins or for an adult version soak the fruit in rum before adding to the mix.


Pin It

Monday 18 February 2013

#Monday Moodboard - Unfinished Work

One of the things I am guilty of is not finishing one thing before I move on to the next. My moodboard this week shows a few craft projects that I am in the midst of, some of which I have been working on for over a year! Surely I'm not the only one who does this...am I?

This week Make, Do, Sew will feature another great guest blogger, a long over due craft tutorial and time permitting, another bake recipe.


I hope you all have a great week.


Pin It

Tuesday 12 February 2013

#52Lists

I am so happy to be a guest blogger on the wonderful Make Do Sew blog.  Very exciting, as this is my first guest post anywhere ever!

I write over at www.catseatdogs.com and I have been blogging for almost a year.  I make jewelry and sell it on Etsy and locally here in the Mid West of America where I live with my husband and 2 boys. We have lived here for about 10 years and I am from Lincoln, UK originally

I am going to share with you a new project for 2013 which could be a great collection by the end of the year.  A nice change from the photographic challenges, although I do love them and I post my 'Photo a Day' every month.  I started the photo challenge at the end of 2012, and I am looking forward to having a full 2013 collection.
 

February 7th 'Your Name'  


The new project is #52lists from the lovely Pip Lincolne of Meet me at Mikes and Justb Blog School. The rules are flexible, make a list and blog/tweet/facebook it using the hashtag #52lists.  One a week with a bit of a catch up to make 52 is my aim.


Rainbows over Brentwood. List 2 


Not strictly a list, but more a gathering of rainbows taken from various locations in my neighbourhood this morning.

Here at Make Do Sew,  I will be listing some iPhoneography apps and filters I use and enjoy.  Let's see where it takes us.  Please do join us and let me know what your favourites are - filter, font, best effect found.  Which app can you not stop using?  Have you always used the same one or do you cheat and go find other apps to use and dump the old ones?!

I use the iPhone 4 for all of my photos, so all of the apps I mention are from the iPhone repetoire.

So, here is List number 3 (yes I included the rainbows and my first list was a photo of a shopping list!)


Seven iPhone apps I like to mess about with and my favourite lens/font/filter in each them

1.  Hipstamatic.
This photo of my French bulldog, Pablo, is taken with the James M lens and the C-Type Plate.


2.  Camera +.
     I like to add the 'Clarity' scene and on top of that put the 'Vibrant' filter in FX Effects and Color
     filter.  This really pulls out colour and detail.


3.  Overgram.
This a photo of some earrings I made.  I added Clarity in Camera+, then popped the photo into Overgram (it is worth paying for the full version I think) and added the Text which is 'Live Simply'.


4.  Laminar Express (used to be called Iris).
For the bananas fighting for a place in banana bread, I used the crop in Laminar Express then added the speech bubbles in Edit - Annotate - Bubbles.


5.  TypeDrawing.
I took this photo in Instagram, then put it in TypeDrawing to get the words on.  It took me a few goes to get the circle right and even more goes to get the last word to end correctly and not overlap.  Thank goodness these apps are very forgiving and we get to try try again!


6.  PicFrame.
I picked the six frame.  Tap each box and add a photo.  Position the photo with your finger.  Keep an eye on the positioning as they sometimes move back to where they started.  I narrowed the frame and added a label.  Remember to save when you are done!  I had to do this one twice as I accidentally hit 'clear' instead of the save 'cloud' thingy.  Oops.


7.  Instagram.
Some bracelets close up.  Instagram is a great sharing machine and I enjoy seeing other peoples photos on there.  It is also a good place to swap techniques, most people are happy to tell you how they got to the end picture.  Just be sure to think before you post as it is a public playground.


All of the apps are in iTunes, some are free and some not.  


Pin It

A Very Warm Welcome to my First Ever Guest Blogger!


I am very pleased to be hosting a series of guest bloggers over the next few months, see my previous post for more info on this.


My first ever guest blogger is Clare, originally from the UK but who now resides and writes her own wonderful blog www.catseatdogs.com all the way from the USA.  


Take a look at Clare's blog, it's great and has lots of fab ideas, musings and photography as well as a cool name!  Clare is also a jewellery designer and maker and sells her designs under the Cats Eat Dogs name on Etsy.


See Clares guest post today (above) and as ever comments always welcome as are guest bloggers!


Pin It

Monday 11 February 2013

#Monday Moodboard - Valentines Day

Last week was a bit up and down, car crash, sinusitis and a broken shower, these things are sent try us. This week should be better and a little high point will be Valentines Day. We aren't doing much but are planning on having a nice dinner together at home, what are your plans? I love receiving cards and keep all cards sent from family and close friends whether it be birthday, Christmas or Valentines. My moodboard this week is a few cards from my Valentines archive.

Happy Valentines Day everyone xxx


Pin It

Sunday 10 February 2013

Chewy Ginger and Oat Cookies - Recipe


Do you like ginger? Do you like chewy cookies? Yes? Then this is your lucky day! Well, not really but it is a good day, here's another easy recipe the family will love.

Ingredients

185g (10oz) Plain flour
225g (8oz) Butter
140g (5oz) Soft brown sugar
140g (5oz) Caster sugar
2 x Eggs
2 tsp Ground ginger
1/2 tsp Baking powder
1/2 tsp Salt
1/4 tsp Nutmeg
Squeeze of lemon and lemon zest (optional)

(Makes approx 24 cookies)

Method

1. Mix the butter, eggs and sugars until well combined.
2. Gradually sift in the flour, salt, baking powder, ginger and nutmeg together.
3. Add the oats a cup at a time and the mixture will start to form a lumpy dough.
4. Add the squeeze of lemon and zest if using.
5. Line 2 baking trays with baking paper and with floured hands roll the dough in to 2 inch balls placing them on the trays allowing enough room for the cookies to spread.
6. Bake in the middle of the oven for 15 mins at 180 degrees Celsius (350f).

For a firmer more crunchy cookie bake for longer, I added more ginger as I like a hotter more spicy cookie. You can also add stem ginger or raisins which taste great too.

The dough can be rolled into a sausage shape and wrapped in grease proof paper twisting the ends. Place in the fridge and slice off the required amount of dough/cookies for fresh baked cookies when you need them.  The dough will last in the fridge for up to four days.


Pin It

Tuesday 5 February 2013

Valentines Day Etsy Finds - Gorgeous Gifts for the One You Love

Valentines day is fast approaching, do you celebrate it? We do in our house, it's a lovely way to break up the post Christmas blues and to take some time out to think about each other rather than the usual day to day worries. I agree that we should do this more than once a year and for the more cynical of you out there it's just a commercial enterprise to make money out of us. But for me the right sentiment is there and we don't go to town and spend lots of money, we just buy a card and a token gift. However that doesn't stop me from perusing Etsy to see what's on offer for Valentines day, it's always fun to have a fantasy wish list. Here's ten finds that are novel, innovative or just plain gorgeous.


Pin It

Monday 4 February 2013

#Monday Moodboard - Marylebone High Street, London

My posts have been rather sparse of late so apologies for that, at the moment life seems to have taken over. Anyway the weekend saw a lovely family gathering in a great Turkish restaurant with lots of great food and company. The simple things yet again are the best.


Have a lovely week.


Pin It
Related Posts Plugin for WordPress, Blogger...